[mathjax]
Preparing a pinhole camera
Needless to say, we have to make a pinhole camera ready when we are going to take pinhole photographs. As for myself, however, I take pinhole photographs by using a single lens reflex camera (SLR). Therefore, I make only an “interchangeable pinhole-lens” corresponding to a conventional interchangeable glass lens of an SLR and load it to the SLR camera to take a pinhole photograph. In the following we may call sometimes an interchangeable optical system made of a pinhole plate and a tube as a “pinhole-lens” for the sake of convenience, though it is not a lens. There are a lot of advantages as described in the following when we take pinhole photographs by using a body of a commercially available SLR camera as: (1) our work to make a pinhole camera is saved, (2) a high sensitivity film can be used easily, (3) setting exposure is easy, (4) we can ask a DPE shop for developing a film instead of developing it by ourselves, etc. These are for the case of a silver film SLR camera, and if we use a digital SLR (DSLR) camera there are some more advantages. On the other hand these advantages spoil your pleasures to do everything by yourself and you may have little appreciation for them. As there are published a lot of books on do-it-yourself pinhole cameras I would not describe such pinhole cameras in this site.
Interchangeable “pinhole-lens”
The easiest way to take a pinhole photograph by a conventional SLR camera is to use an interchangeable “pinhole-lens” made of a body cap of a SLR camera. Such a “body-cap pinhole-lens” is made by drilling a hole larger than the pinhole at the center of a body-cap of the camera and attaching a thin metal (alminum or brass) sheet with a pinhole to this hole. Though it is very easy and simple if you use only one “pinhole-lens”, a lot of body-caps are necessary if you are to take photographs by using different “pinhole-lenses”, such as those with a different pinhole size, a different focal length (length from a pinhole to a sensor) or, sometimes, other types of lensless optical elements as a zone plate or a 2-step-slit-plate, which will be described later. In order to cope with this inconvenience I am using an “interchangeable pinhole-lens system”. For this purpose I made a “pinhole-lens adapter” by using a body-cap and a tube of cardboard. Then I made an “interchangeable pinhole-lens“ by attaching a metal sheet with a pinhole to a cardboard tube with a smaller diameter than the adapter tube, which can be inserted to the adapter tube leaving no space between. “Zone plate-lenses” and “2-step-slit-plate lenses” are also made in this way and by using this “interchangeable pinhole-lens system” I can handily take zone plate photographs and 2-step-slit-plate photographs as well as a pinhole photograph.
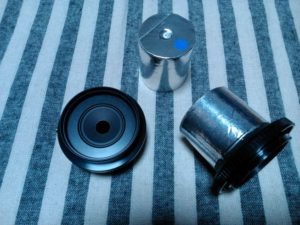 Interchangeable “pinhole-lens system”
Some examples of “pinhole lens adapter”, “pinhole-lens” for Olympus E-series DSLR
Designing a pinhole
How small is the optimum diameter of a pinhole? If the diameter of a pinhole is very small incident radiation is faint and necessary exposure time becomes long. But it may be imagined that clearer image could be attained by decreasing the diameter of the pinhole as small as possible. Is it really the case? When the diameter is large enough it is certainly true, i.e., clearer image is obtained by decreasing the diameter of the pinhole. However, if the diameter is decreased less than a certain value then the image becomes to blur. The cause of the blur is the ”diffraction phenomenon of the light“ which will be described at the pages on the zone plate photography. In brief, decreasing the diameter of a pinhole decreases both the straight-traveling light and the diffracted light which sneaks into the backside of the pinhole plate, but the decrement of the straight light is far larger than that of the diffracted light. Therefore, the amount of the diffracted light relatively overwhelms the amount of the straight light and the image blurs. Thus decreasing the diameter needlessly does not help to make the image sharp.
Then how much is the pertinent size of the diameter (\(d\)) of the pinhole (Appendix 4)? Suppose the radius of an image of a point source at infinity by a pinhole with a radius of \(a(=d/2)=a’\), where the image of the point source is enlarged to a circle with a finite area due to the diffraction. By setting the radius \(a\) equal to \(a’\), and an equation for the optimum diameter of the pinhole is derived as \(d\cong 2 \sqrt{0.6098 \lambda f}\) \( \cong 1.56 \sqrt{\lambda f}\). In this equation \(f,\lambda\) are the focal length and the wavelength of the light, respectively. Though the wavelength of the visible light ranges from \(400 nm\) to \(700 nm\) \( (1 nm = 0.000001 mm)\) and we cannot set down a single value strictly, \(\lambda = 550 nm\) \( (5.5 \times 10^{-4} mm\)) is usually employed as a representative value of the wavelength of the light. For this value of the wavelength the size of the diameter of a pinhole is given in unit of mm as $$d\cong 2 \sqrt{0.6098 \lambda f} \cong 0.0366 \sqrt{f} $$
In this way the optimum diameter of a pinhole is proportional to square root of the focal length. As this value is not very strict because of the above reason a pinhole with a diameter of \(0.2 – 0.5 mm\) is usually adequate to take a photograph with a focal length of several to about ten centimeters. Actually, the optimum diameters of a pinhole of the focal length of \(f=50\) and \( 100 mm\) for the wavelength of \(\lambda=550 nm\) are \(d=0.26 mm\) and \(0.37 mm\), respectively. By the way, if we consider pinholes of the focal length of \(50\) and \(100 mm\) for the range of the visible light wavelength (\(\lambda=400~700 nm\)), the optimum diameters are calculated as \(d=0.22~0.30 mm\) and \(d=0.31~0.42 mm\), respectively.
Pinhole Photography by Digital SLR (DSLR) Camera
Soon after I began to take pinhole photographs the age of silver film cameras had changed to the age of digital cameras. Though I was using SLR cameras of the Olympus OM series, the series went out of production and I switched to digital cameras. I am now using Olympus E-series Digital SLR cameras(DSLR), E-300 and E-510, for the pinhole photography. By using these cameras I found that DSLR is quite a suitable SLR camera because one can look at taken photographs on the moment, one can take photographs again and again until a satisfactory picture is obtained, and no cost for film and development is necessary. Of course it spoils the pleasure in a dark room to wait the moment a picture appears.
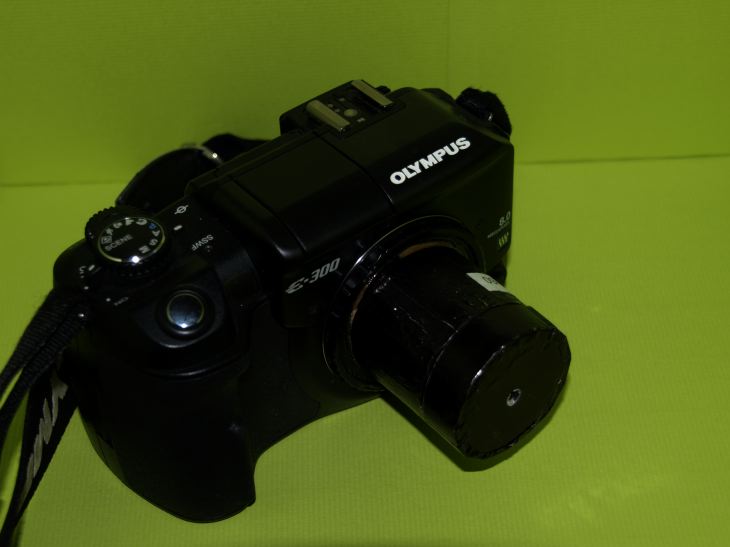 Olympus DSLR E-300 with a ”pinhole-lens”
Of course, there is a weak point in the digital pinhole photography. An image sensor of DSLR which corresponds to a film of an analogue camera is generally small. As the resolution (Appendix 5) of the image depends on the size of the pinhole and the focal length, a small sensor cannot attain a high resolution even if the number of pixels is large. In the case of a do-it-yourself pinhole camera one can use a large film or a large contact paper as an image sensor to take a sharper photograph but it is not possible or very difficult in the case of a digital camera. Especially the Olympus E-series DSLR which I use regularly has an image sensor of the FourThirds format, which is the smallest format among commercially available DSLRs. The reason I use the E-series DSLR in spite of this defect is that the dust reduction system of these cameras is excellent and I can change the ”pinhole-lenses“ frequently without worry.